Showing posts with label tim holtz. Show all posts

Sunday, 16 February 2020

Planner Layout fun!

Layout with Sassy Club stamps
I decided to have fun with my May layout, after all, it's all about the "fourth". 


If you like my layout please consider buying using my Sassy club affiliate link below! Thank you :)
Materials
Sassy Club Rebel Forces
Washi tape
Distress Oxide spray in Black soot and Chipped Sapphire
Tim Holtz star stencil (Stamptember exclusive)
Ranger matte Texture paste
Memento Black Ink
Xpress it card
Copics
White uniball pen
Silver sparkle sequins
Tombow mono glue
Happy Planner

Friday, 22 March 2019

Materials List
Congratulations stamp by Stampabilities
Couple Silhouette cut with a Silhouette Cameo machine
Distress Inks, Tumbled Glass,Salty Ocean, Blueprint Sketch, Wilted Violet, Picked Raspberry
Tim Holtz watercolour paper.
Tim Holtz round blending foam
Memento Ink in Black Tuxedo.
Tim Holtz Mini Stencil Set #2
Perfect Pearls sprays in Pearl and Gold

Thursday, 4 August 2016

Feeling lyrically inspired for the MIO hop


Welcome to the August My Inky Oasis hop.

        In case you missed it here is a link to Laura's gorgeous creation.

I found this challenge to be a hard but creative one...mostly because I didn't think I had stamps that fit lots of the lyrics I thought of. But eventually I was reminded of Bob Marley's cheerful song "Don't Worry, Be Happy" and picked this verse to illustrate: 


"Rise up this mornin',
Smile with the risin' sun,
Three little birds
Pitch by my doorstep
Singin' sweet songs
Of melodies pure and true"


Products used:
Tim Holtz stencils Rays and Mini set #5
Heidi Swapp Music stamp
Colour Shine spray in Mustard and Gold
Distress Spray Stain in Squeezed Lemonade
Tim Holtz Music Tape
Tim Holtz blending sponge tool (round)
ZigClean Colour Markers in: 050, yellow; 052, bright yellow; 021. light carmine; 025, pink; 027, dark pink; 081, light violet; 082, purple; 080, violet
Ranger Texture Paste Transparent Gloss

If you want to hop on to the next stop to see the lovely Robbie's wonderful card.

Here is what you can win this month, just leave some love on each blog...
Closing date 25th August 2016

Here's the complete hop:
2. Emma ←you are here
4. Joy
5. Linda
6. Lisa


Thursday, 2 June 2016

Dominant colour challenge with My Inky Oasis


Check out Robbie's amazing card here.


Welcome to my first hop post for My Inky Oasis
This months theme was using orange as a dominant colour. Orange is not usually my first choice of colours so it was an interesting one for me. I love poppies so I decided to go with orange poppies rather than the stereotypical red.
So here is my card:
Tape down Tim Holtz's watercolour paper (I use micropore tape that I first dab on a fluffy jumper to remove the stickiness). Wet. Using Zig clean colour pens, use some shades of orange and pale green on the background to give a very pale wash. Let dry.
Stamp poppies from Tim Holtz's Flower Garden set using Distress Ink in Scattered Straw, or the palest ink colour you have. You will need to use the masking technique to get the two background poppies. Let dry again.
Use Zig clean colour markers, a brush and water again to watercolour the image and background.
Using Art Institutes Designer Dries Clear glue, attach Prills in Power Outage to ends of stamen to give dimension.

Colours for Zig markers:
050 yellow, 002 Fl Orange, 070, Orange, 052 Bright Yellow, 045 Pale Green, 044 Deep Green, 080 Violet, 036 Light Blue, 095 Dark Grey, 010 Black.

Later I made it into an anniversary card...
I just added a foiled die cut from Hero Art's Happy set. You can't see it too well, but it's gold foil (using a Minc Machine) and then stamped anniversary in black.

Please join our group on Facebook too, and have some inky fun! My Inky Oasis 

Hop on over to Lisa here

Here is the complete hop:

1. Laura
3. Robbie
4. Heart of Craft ← you are here
5.Lisa
6. Joy

Here is this month's prize, donated by the lovely Laura. Three cheers for Laura!
TO ENTER:
To enter the giveaway to win this killer prize pack, all you have to do is leave some love on each blog in the hop! How easy is that!?!

All opinions are my own. I have no commercial or affiliate links, product links are for your convenience, feel free to shop around!

Thursday, 5 May 2016

Your Heart's Desire with Laura's Loft


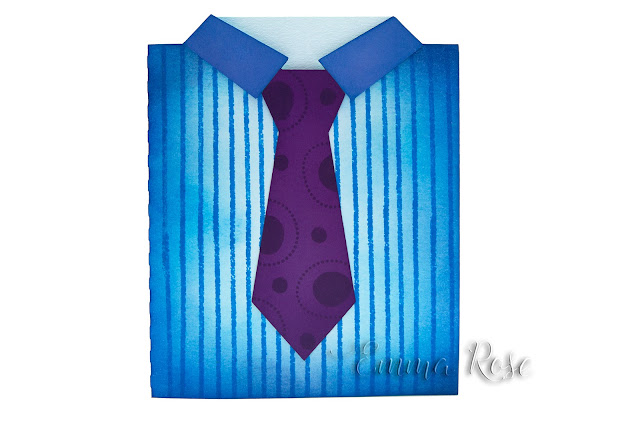
This months shop and hop has a little bit of a mixed bag from me....a Father's day card (I think maybe my hearts desire is neatly pressed and laundered shirts, preferably ones that I didn't have to do myself!) and a touch of coffee...something I long for since I am not allowed it any more! Still, in lieu of that I will take chocolate :)


So here is my first card. I love this shirt cut as it is so versatile. I cut a pattern with my Silhouette Cameo, but you could cut it by hand, use a Cricut or find some dies.
Then I sponged around the edges with a Tim Holtz sponging tool and Distress Inks in Tumbled Glass, Salty Ocean and Blueprint Sketch. Then over stamp in Salty Ocean with the lines from MFT's (My Favourite Things) Abstract Art set. I love finding yet new ways to use this set!
Then sponge the tie with Distress Ink in Wilted Violet and over stamp with MFT's Party Patterns set. Assemble the card and voila...all done. Nice and easy. You can come up with so many shirt and tie combos with either or both of those two pattern sets.

For my second card I again used Tumbled Glass, Salty Ocean and Blueprint Sketch inks on the outside of a panel of white card. Spritz with water and blot. I stencilled the middle of the card with stencils from Papertrey Ink (chevrons) and Tim Holtz (coffee stains) using the same colours of Distress Inks in Vintage Photo with a touch of Walnut Stain.
Stamp the charming coffee loving cat from Newton Loves Coffee in Memento Ink in Tuxedo Black on watercolour paper. Colour with Zig clean markers and a watercolour brush. Fussy cut.
Die cut Tim Holtz's Sizzix Bigz coffee cup die (or use a Silhouette or Cricut). Sponge the edges of the cup with Antique Linen and Vintage Photo Distress Inks. Use a Prismacolour pencil for some shading and over stamp a dot texture (I use Tim Holtz's Cracks and Specks). Sponge the label in shades of blue and stamp the sentiment and coffee beans from the set. Shade the beans a little with the coloured pencil. Lastly sponge the lid in Pumice Stone Distress Inks. Assemble, and put in some shading with a deep blue Prismacolour. Adhere to card. Using some Designer Dries Clear glue stick on some coffee coloured Prills to the coffee stain to give dimension.


This months amazing prize....
And all you have to do is leave a little love at every blog stop! Easy :)
 While you are here, why not check out Laura's shop..there is an amazing sale...35% off from May 5th until Midnight on May 15th!


Here are all the stops:
1. Laura
2. Deana
4. Robbie
5. Heart of Craft ← you are here
6. Lisa

Saturday, 16 April 2016

April Challenge with Laura's Loft


Welcome to this month's challenge with Laura's Loft!
This challenge is using the colour swatch below, a gorgeous soft palette of purples, greys and blacks


First make your background card textures. Using some Neenah white 80lb cardstock and a Tim Holtz mini blending foam applicator sponge on Distress Inks in Wilted Violet, Shaded Lilac, Hickory Smoke, Pumice Stone. Spritz with water and blot. Put the grungy circles stencil from Tim Holtz's Mini Stencil set #5 over half the image. Spray through with Distress spray in Shaded Lilac . Spritz over the top of that with Tsukineko's silver shimmer mist spray. On a 2" x2" stitched panel (use a die, Silhouette or Cricut machine) made from grey card stamp spots from Stampers Anonymous in London Fog ink by Memento. Edge by sponging with Shaded Lilac Distress Ink.
On separate cardstock stamp the flowers from MFT (My Favourite Things) Fall Floral set using Memento Inks in Grape Jelly, Lulu Lavender, Danube Blue, Tuxedo Black and London Fog. Highlight areas with a white gelly roll pen. Cut using dies, a machine, or by hand.
Cut a light purple panel and a dark purple card to fit. From the dark purple card also cut "Birthday" from Papertrey Inks die set.
Work out a pleasing arrangement and adhere. Stamp "Happy" from Papertrey's set. Put on some accents using Glossy Accents by Ranger.


This is certainly a palette I'd use again!
How about having a go yourself?
This month there are two prizes. Yipee!

$20 Store Credit 


Want some more inspiration?
Then visit Laura, Deana or Jasmine....

Friday, 15 January 2016

Fantasy cards

I'll admit it, I'm a huge fan of the fantasy genre... Lord of the Rings, Eddings, Jordan... I wish there were more stamps around of non-cute dragons, unicorns and so on...but finding any proved hard, so I decided to use my trusty Silhouette machine to make a get well card for fellow fantasy lover I know. The dragon was cut from yellow cardstock, then sponged using Tim Holtz's round blending tool with distress inks in shades of orange and red. Spritz with water and blot. Then I over stamped with Papertrey Ink's Brushed Off set and Tim Holtz's Cracked and Specks set to finish the look.
Some gold thread was wrapped around my fingers and adhered under the dragon. I ripped some paper with writing on it (a dragon summoning scroll perhaps?) and stuck that to a red A2 card. Then the dragon and thread was placed on tip.

Wednesday, 6 January 2016

CAS-ual Fridays with Laura's Loft.


Today I am helping celebrate the release of some wonderful dies from Cas-ual Fridays, available from Laura's Loft


I will be using the two sets Tag Buddies and and Friendly Flowers Fri-dies which are so much fun!
For this release I decided to experiment with some mixed media for a change. Start by die cutting your tags and flowers multiple times from white card stock (I used Michaels' Recollections). You'll need lots of the flowers especially!
Use some of Tim Holtz's tissue tape on the tags. Then smear some Distress Paints onto a craft sheet (I use Teflon cooking sheet). Mist very lightly with water, then smear your tag through it. I used Salty Ocean, Picked Raspberry and Seedless Preserves. Mist slightly again. Let dry, or if you are impatient use a hairdryer or embossing tool to carefully dry it.  Use Ranger Transparent Medium applied with a spatula through Studio 490's Polka Dotty stencil across the bottom left corner and let dry. This will take a while, so move onto the flowers while they dry. Colour the white card using the Ranger Round Mini Ink Blending Foam and Distress ink pads to match the paint colours you used. Spritz with water, blot and dry. Over stamp with lettering from Tim Holtz's Urban Grunge set using a Grape Jelly Memento pad and Ink Splodges from MFT's Abstract Art set using a Rose Bud Memento ink pad. The construct the flowers. Some of them I bent sharply along the centre of each petal to give a more star like shape. Others I used embossing tools or Heartfelt Creations flower shaping set to make the petals curl and become a rounder shape. Experiment and see how many combinations you can make!
I picked out some details using Ranger's enamel accents in white. Let dry and assemble flowers using your adhesive of choice.  Using Distress ink pads in Dusty Concord, Vintage Photo and/or Walnut Stain, ink the corners of your tags to darken them and increase the contrast with the flowers.
Use the Dusty Concord to stamp butterflies from Close to my Heart (Find Your Style) and Clearly Besotted stamps on the tags. Assemble and let dry. Meanwhile cut some ivory cardstock 0.25" shorter than a base purple card. Ink the edges with Antique Linen Distress Inks and adhere the panel to your base card. Arrange the tags in a pleasing manner and stick them on. Voila, pretty floral mixed media tags. You can buy some of my favourite Distress Ink pads from Laura's Loft. I warn you they are addictive though!


Monday, 31 August 2015

Stamp-a-Fair 2015 Challenge- Using Twine

Having been using lots of bright colours as an antidote to the all white bridal card that kicked off the day, I decided to go back to more muted colours for the Stamp-a-Fair using twine challenge.
I went back to one of my favourite sets, the topiary trees from Papertrey Ink. I made two tags and stamped them in muted colours using Memento ink pads. I accented the flowers with a little Recollections purple glitter glue for a little sparkle! Then I tied the tops with two colours of twine. The background was sponged with a sea sponge, then over stamped with the specks from Tim Holtz Cracks and Specks ste. Et voila....quick and simple (well it would have been had I not spend an hour working out the design...).

Tuesday, 7 July 2015

Feeling dotty!


Trying to go outside of my comfort zone again by using some bright colours! The background was created using Heidi Swapp's colour shine sprays in Sweet Cherry, Mustard and Patina through a dots stencil by Studio 490 onto Tim Holtz's watercolour paper and ripped. 
The edges were stamped using Finnabairs bubbles stamp with Distress Inks in Mowed Lawn, Wild Honey and Fired Brick. They were also used to stamp the feathers from Stampin' Ups Four Feathers set (discontinued), which I hand cut, including the feather line. The circle behind them is a Sizzix orignals circle #2 die (a single circle, discontinued, but you could use any circle die or a Cricut/Silhouette machine), crumpled, distress with Tim Holtz's distress tool and edged with Distress Ink in Antique Linen